Photographing Film Negatives (Negative Digitizer)
Create positive copies of color or black-and-white film negatives. [] is accessed via the i menu during live view photography.
-
Position the negatives in front of a featureless white or gray background.
-
We recommend using an AF‑S Micro NIKKOR 60mm f/2.8G ED or other micro lens and an ES-2 film digitizing adapter.
-
We recommend using either natural light or an artificial light source with a high Ra (color rendering index), such as a light box or a high-CRI fluorescent lamp.
-
-
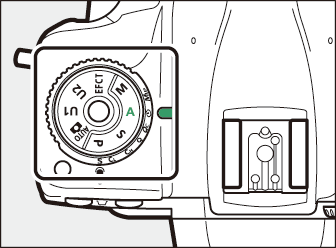
Rotate the mode dial to A.
We recommend that you choose a sensitivity of ISO 100 and an aperture of f/8.
-
Rotate the live view selector to C and press a.
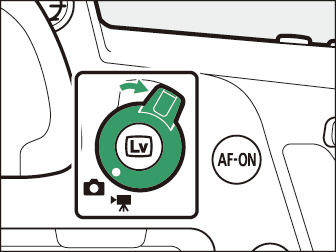
The view through the lens will be displayed in the monitor.
-
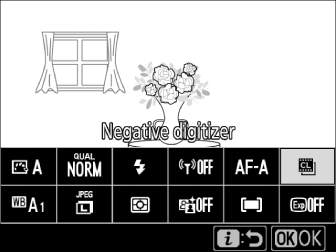
In live view, press the i button and select [].
-
Highlight [] using the multi selector and press J; the colors in the display will be reversed.
-
The flash mode is automatically set to s. To use a flash, choose a flash mode other than s.
-
-
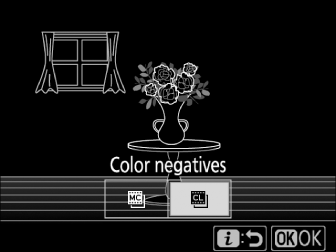
Choose the film type.
Press 4 or 2 to highlight [] or [] and then press J.
-
Compose the shot to capture a frame of the film negative.
-
Adjust exposure.
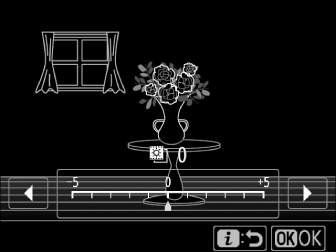
-
Press J to display brightness adjustment options. Press 4 or 2 to adjust exposure. Press J again to save changes and exit.
-
To view your subject at a higher magnification, press X (T).
-
-
Take photographs.
-
The photographs will be saved in JPEG format.
-
Press the i button to exit negative digitizer mode.
-
-
No options are available for correcting dust, scratches, or uneven colors due to faded film.
-
Photos are saved in JPEG format even when [] is selected for image quality. Photos taken with a JPEG option selected will be saved at the chosen setting, while photos taken with [] selected will be saved in [] format.
Some camera features cannot be used with the negative digitizer, including:
-
Modes other than A
-
Movie recording
-
Bracketing
-
Multiple exposure
-
HDR (high dynamic range)
-
Interval-timer photography
-
Time-lapse movies
-
Focus shift